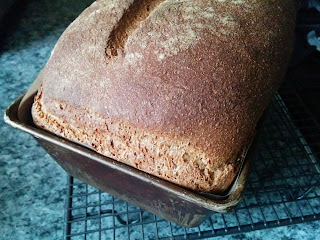
Bread baking intimidates.
I know that from experience.
However I have also learned to persevere and learn from my mistakes.
Our bread baking journey began many years ago with a bread maker.
Ingredients dropped in and the machine did all the work. Brilliant.
I fiddled with the recipe and removed the sugar, fat and milk powder.
Then unhappy with the shape of the final bake we simply used the dough function;
lifting the dough out and shaping it for a loaf tin before a final prove and bake in the oven.
I look back now and wonder why we were so intimidated with the dough process.
But isn't hindsight is a wonderful thing.
Then one day the paddle broke.
I didn't want to buy a new machine and I didn't want to give up my homemade loaf
and never having got the hand of kneading I didn't want to do that either.
Although I now have a stand mixer, I didn't at the time.
I have also learned over time that moisture and time are bread's best friends.
So that's what I gave it.
I have used a variety of flours and flavours.
Although be aware flour type dictates how much water is needed.
Sometimes I free shape (as above)
sometimes I shape and prove in a basket and turn out to bake
and sometimes I bake it in a loaf tin.
This recipe is a spring board for experimentaton.
Give it a go ...
I use easy bake or quick yeast as this does not need rehydrating or fermenting.
It can be mixed directly into the dry ingredients although I usually add it to the water first.
I now weigh all my ingredients on a digital scale, although this is more accurate I managed with an ordinary set of scales, measuring spoon and a glass jug for years.
Yeasted loaf
Standard 2 lb loaf tin or a banneton to shape and a tray to bake
Standard 2 lb loaf tin or a banneton to shape and a tray to bake
350g/ml tepid water (325g if using all white)
1 1/2 tsp (6g) easy bake yeast / quick yeast
250g Strong white bread flour
250g Strong wholemeal bread flour
1 tsp salt
1 tsp salt
- Weigh/measure the tepid water into a large mixing bowl.
- Add the dried yeast and mix to dissolve, this takes only a moment
- Weigh/measure the flour and salt
- Mix to a shaggy mess making sure all the flour is mixed in and leave to rest for 30 minutes covered with a tea towel ( I prefer not to use plastic)
- This will allow the flour to absorb all the water and allow the yeast to begin breaking down the starch into sugars
- After the initial rest perform a series of stretch and folds to begin developing the gluten. Lift a small section and lightly stretch it and fold it into the middle. Be careful not to tear the bread and break the gluten strands. I usually count 15-20
- When you have gone all around the ball of dough turn it over, it should be rounded in shape
- Cover and leave for 20 minutes
- Repeat this twice more.
- Whilst doing the third set of stretches you will notice that the dough has begun to increase in size, feels a little airy and is starting to resist
- Cover and leave to prove for 1 to 1 1/2 hours depending on the warmth of your kitchen
- It should have doubled in size
- Punch put the air and turn it out onto a very lightly floured or oiled board
- At this stage you could divide the dough into three to plait and place on a tray to rise
- Otherwise shape the dough into a rough oval (the same shaping applies to basket and tin) then fold each side in to form a rectangle
- Then fold the top down and tightly roll the dough towards you
- Place the dough seam down in a tin and seam up in a basket (to allow for turning out to bake)
- Cover the dough with a tea towel and leave to rise for 45 minutes to 1 hour until nearly doubled in size (experience will determine accuracy)
- Preheat the oven to 220 C fan assisted 20 minutes before baking
- Turn out onto a baking sheet unless you are baking in a tin
- Slash the top to allow expansion in the oven
- Bake for 30 minutes
- Remove the loaf from the tin or tray as soon as possible as the bread will sweat and make the crust soft
- Leave to cool for at least 30 minutes if you can
*
The dough can be upsized as required.
I have a larger tin that takes 750 g flour, 525-550g water, 2tsp yeast and 11/2tsp salt.
This bread freezes well.
I usually half the loaf then freeze so we don't have too much lying around.
Although when both my children were at home we could easily get through a loaf a day
if sandwiches were required for school.
The bread will not keep as well as shop bought because it is free from preservatives.
But I don't think I need to explain the benefits of home baking.
X


Comments
Post a Comment